Table Of Contents
I decided to go with CentOS Stream as the base OS it’s the most familiar to me, but there are many great options. This cluster is not going to be hardened or production-ready, in this case, I needed a quick one set to test some distributed algorithms and to give my cluster of 10 Raspberry Pi’s something to do.
Install CentOS Stream
Download the image from https://www.centos.org/download/
Burn it to a DL-DVD if you have any around.. or create a bootable USB
Creating a bootable USB with CentOS 8 Stream
If you’re using Linus as your main OS, then dd is the most straightforward way. Just use dd and target the flash drive, but make sure to reference the main device and not a partition.
dd if=CentOS-6.5-x86_64-bin-DVD1.iso of=/dev/sdz
Device names on windows are not as pleasant to work with, so while dd is an option on Windows, I find Win32 Disk Imager a quicker option. Several more options can be found here https://wiki.centos.org/HowTos/InstallFromUSBkey
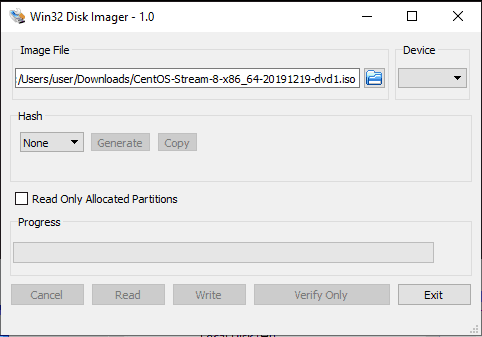
Transfer the image to the USB drive using Win32 Disk Imager
Just select the ISO and Device, and hit Write. Takes a few minutes, and it’s ready for install.

How to fix a USB drive after Win32 Disk Imager
Win32 Disk Imager needs exclusive access to the USB drive. If anything interrupts the process, or it can’t get lock the device, it’s going to mess it up a bit, and Disk Management in Windows 10 can’t fix that. Instead, we’ll need to use DiskPart.
Run CMD as Administrator and run the following in sequence. This will take some time, as it formats the drive.
diskpart
list disk
(make note of the number assigned to your USB drive)
select disk X
clean
create partition primary
active
format fs=fat32 label=""
assign
exit
Install CentOS Stream
Boot off of the DVD or USB drive, and install as normal.
Since this is going to be the kube master, give it a hostname that will help you identify it later.
Installing Docker on CentOS 8 Stream With Yum
Update Yum Package Database
sudo yum check-update
Install the dependencies
sudo yum install -y yum-utils device-mapper-persistent-data lvm2
Add the Docker Repository
sudo yum-config-manager --add-repo https://download.docker.com/linux/centos/docker-ce.repo
Install the Docker Engine
- As of the writing of this,
containerdfails to install automatically, and you need to specify the version. Just run this:
dnf install https://download.docker.com/linux/centos/7/x86_64/stable/Packages/containerd.io-1.2.6-3.3.el7.x86_64.rpm
Now you can install the rest
sudo yum install docker-ce docker-ce-cli
Start docker
sudo systemctl start docker
Optionally, you can start a test container to make sure everything works
sudo docker run hello-world
Done. Repeat the procedure on every node you want in the cluster
Installing Kubernetes on CentOS 8 Stream
Add the kubernetes repo
cat <<EOF > /etc/yum.repos.d/kubernetes.repo
[kubernetes]
name=Kubernetes
baseurl=https://packages.cloud.google.com/yum/repos/kubernetes-el7-x86_64
enabled=1
gpgcheck=1
repo_gpgcheck=1
gpgkey=https://packages.cloud.google.com/yum/doc/yum-key.gpg https://packages.cloud.google.com/yum/doc/rpm-package-key.gpg
EOF
Install kubelet, kubeadm, and kubectl
sudo yum install -y kubelet kubeadm kubectl
systemctl enable kubelet
systemctl start kubelet
Update the hosts file on each node to know about each other
Open necessary ports on the master node
sudo firewall-cmd --permanent --add-port=6443/tcp
sudo firewall-cmd --permanent --add-port=2379-2380/tcp
sudo firewall-cmd --permanent --add-port=10250/tcp
sudo firewall-cmd --permanent --add-port=10251/tcp
sudo firewall-cmd --permanent --add-port=10252/tcp
sudo firewall-cmd --permanent --add-port=10255/tcp
And on each worker node
sudo firewall-cmd --permanent --add-port=10251/tcp
sudo firewall-cmd --permanent --add-port=10255/tcp
Create a new config file under /etc/sysctl.d/ (ex: master_node.conf) and enter the following. This makes sure that packets are processed by iptables during port forwarding
net.bridge.bridge-nf-call-ip6tables = 1
net.bridge.bridge-nf-call-iptables = 1
Reload config
sysctl --system
Disable SWAP
sudo sed -i '/swap/d' /etc/fstab
sudo swapoff -a
Deploy a Kubernetes Cluster
Setup Pod Network
Install flannel
sudo kubectl apply -f https://raw.githubusercontent.com/coreos/flannel/master/Documentation/kube-flannel.yml
Create a Cluster with kubeadm
sudo kubeadm init -pod-network-cidr=10.244.0.0/16
Check the status of the cluster
sudo kubectl get pods --all-namespaces
Manage the cluster a regular user
mkdir -p $HOME/.kube
sudo cp -i /etc/kubernetes/admin.conf $HOME/.kube/config
sudo chown $(id -u):$(id -g) $HOME/.kube/config
Join Worker Node to Cluster
kubeadm join --discovery-token cfgrty.1234567890jyrfgd --discovery-token-ca-cert-hash sha256:1234..cdef 1.2.3.4:6443
Verify Nodes from Master
sudo kubectl get nodes
Tags
Related Posts
Subscribe To My Newsletter
Quick Links
Legal Stuff


