Table Of Contents
There are several things we need to do in order to achieve end-to-end security in our release pipeline. In this post, I’ll explain how to set up signing git commits and store the private key on a YubiKey using it as a smart card. Signing our commits is especially important in public projects like those on GitHub, to avoid people impersonating us. For private projects and later on in the build pipeline, we can validate that all our commits are signed by trusted parties, and add gates to protect against unauthorized code making it into our products.
If you don’t already have one, go pick up a YubiKey, you’ll be really glad you did. Then set it up as a 2nd factor everywhere you can.
Alternatively, you can now build your own security key thanks to Google https://security.googleblog.com/2020/01/say-hello-to-opensk-fully-open-source.html but I haven’t tried that yet, as my nRF52840 board is arriving next week.
YubiKey supports a large number of protocols. The YubiKey 5 NFS supports WebAuthn, FIDO2 CTAP1, FIDO2 CTAP2, Universal 2nd Factor (U2F), Smart card (PIV-compatible), Yubico OTP, OATH – HOTP (Event), OATH – TOTP (Time), Open PGP and Secure Static Password, and cryptographic operations using RSA 2048, RSA 4096 (PGP), ECC p256, ECC p384. On top of all of these, it can function as a FIDO HID Device, CCID Smart Card and HID Keyboard.
For our purpose, we’re interested in it acting like a Smart Card that holds a GPG* (Gnu Privacy Guard) key since the YubiKey can look like a PIV (Personal Identity Verification) Smart Card.
- GPG is a rewrite of PGP (Pretty Good Privacy). PGP uses the RSA and IDEA encryption algorithms, while GPG uses the NIST AES (Advanced Encryption Standard).
Install Gpg4Win
First, we’ll need a toolkit to facilitate our GPG usage. I found Gpg4Win to be very well suited for the task. You can download it at https://www.gpg4win.org/thanks-for-download.html
The install is straightforward, defaults work fine.
Generate a GPG Key Pair
Take your existing private key pair and import it, or generate a new one. I recommend going with a 4096 GPG key pair, as that’s the largest supported by newer YubiKeys. If you have a YubiKey Neo, you can create a separate 2048 signing key. Scott Hanselman covers how to set up a YubiKey Neo with 2048 bit keys https://www.hanselman.com/blog/HowToSetupSignedGitCommitsWithAYubiKeyNEOAndGPGAndKeybaseOnWindows.aspx
To create a new key, click File -> New Key Pair... then click Create a personal OpenPGP key pair. Enter your name and Email (make sure it’s the same email you use on GitHub). Then click Advanced Settings and select 4096 bits for RSA and + RSA and choose a validity period. The default 2 years is good, which will force you to rotate your key frequently enough for this type of usage. I don’t recommend having a key that doesn’t expire, since losing it puts you at greater risk long-term, and you have to take extra-special care of your revocation keys.
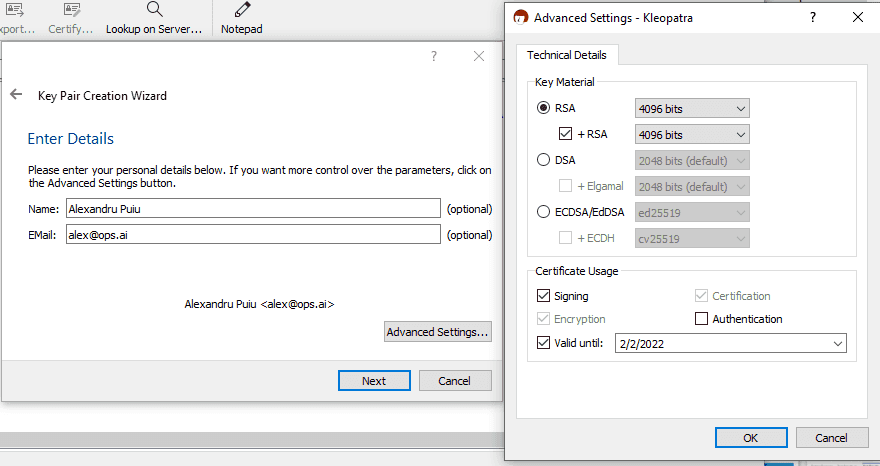
Then hit Next and Create and you’ll be prompted to enter a Passphrase and repeat it. Choose a strong one, ideally generated by your password manager, click Ok and wait until your keys are generated. At this stage, you might want to make a backup of your Key Pair, but if you do, make sure to keep it in some sort of offline storage like a USB drive or floppy disk you got just for this purpose (they keys are small enough and floppy drives still exist).
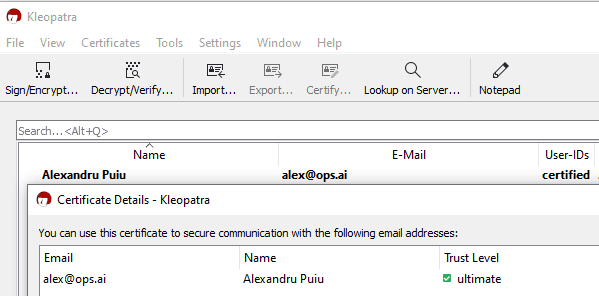
If you imported your key, make sure that your UID contains the email address that you use on GitHub.
Create a revocation certificate
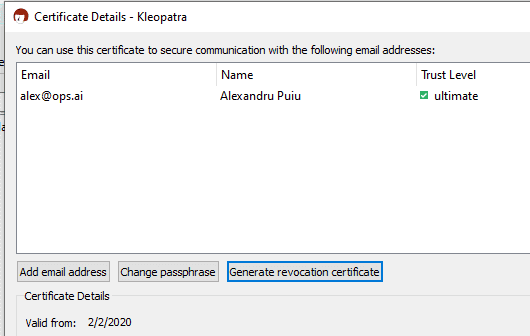
This step is very important because our YubiKey might get lost or stolen. While our GitHub accounts are protected by separate SSH keys, and the private key is protected by a PIN, there’s still risk present in other forms. We want to take the extra measure of revoking the key in those situations.
Double click on the certificate you created, click Generate revocation certificate and save it to a safe place that you back up.
Prepare The YubiKey
When you plug in your YubiKey, it should get auto-detected and installed. It’ll show up in Device Manager under Smart cards something like Identity Device (NIST SP800-73[PIV]). This is fine for most Multi-factor authentication usages, but we’ll need some additional functionality, so we need to install the YubiKey Smart Card Minidriver which we can get from https://www.yubico.com/products/services-software/download/smart-card-drivers-tools/
Download and unzip the driver to a folder. Go to Device Manager, right-click on Smart Cards -> Identity Device (NIST SP800-73[PIV]), click Update Driver and point it to the folder containing the driver you downloaded. It should now see it as YubiKey Smart Card Minidriver.
Next, go to the command line and let’s confirm that we can see it as a smart card.
>gpg --card-status
Reader ...........: Yubico YubiKey OTP FIDO CCID 0
Application ID ...: ...
Application type .: OpenPGP
Version ..........: 2.1
Manufacturer .....: Yubico
If you see something like the above, mentioning your YubiKey, you’re good to go. Sometimes Windows machines and corporate laptops might have multiple smart card readers, or might not detect your Yubikey as one here. To solve that, we’ll need to manually point GPG to the right place.
Create an empty file %appdata%\gnupg\scdaemon.conf and add a reader-port line that points to your YubiKey. To get the exact name of the device, go to Device Manager, then View -> Show Hidden Devices and expand Software Devices. Then add the exact spelling into the scdaemon.conf file you created like this:
reader-port "Yubico YubiKey OTP+FIDO+CCID 0"
Save the file, and next you’ll need to kill/restart any GPG services or background apps you have open, so it detects the changes. Alternatively, you can restart your computer. In my case, I just had to close Kleopatra and kill the GnuPG's private key daemon processes. If all goes well, when you run gpg --card-status now, you should see the YubiKey.
Change Pin
YubiKeys come with a user pin set to 123456 by default, and an admin pin set to 12345678. Before starting to use the PIV functionality of a YubiKey, it is important to change the PIN, PUK and Management keys from their default values. For this step, you’ll need to download and install the Yubikey Manager, which you can get from https://developers.yubico.com/yubikey-manager-qt/Releases/.
I had trouble with the GUI not seeing my key, but the CLI lets us specify some additional params so we can force the correct reader. Open a command prompt in C:\Program Files\Yubico\YubiKey Manager and make sure you can see the key. Run ykman info to check. If it doens’t see it, try ykman --reader yubico info. Here’s what mine looks like:
C:\Program Files\Yubico\YubiKey Manager>ykman --reader yubico info
Device type: YubiKey 5 NFC
Serial number: ...
Firmware version: 5.1.1
Form factor: Keychain (USB-A)
Enabled USB interfaces: OTP+FIDO+CCID
NFC interface is enabled.

Applications    USB     NFC
OTP             Enabled Enabled
FIDO U2F        Enabled Enabled
OpenPGP         Enabled Enabled
PIV             Enabled Disabled
OATH            Enabled Enabled
FIDO2           Enabled Enabled
Now we can set all our pins and create a random management key and store it on the device, protected with the PIN.
ykman --reader yubico piv change-pin
ykman --reader yubico piv change-puk
ykman --reader yubico piv change-management-key --generate --protect
For more details, including recovering from a blocked PIN see https://developers.yubico.com/PIV/Guides/Device_setup.html
Move Private Key to YubiKey
Back in the command
> gpg --edit-key [email protected]
gpg (GnuPG) 2.2.19; Copyright (C) 2019 Free Software Foundation, Inc.
This is free software: you are free to change and redistribute it.
There is NO WARRANTY, to the extent permitted by law.

Secret key is available.

sec  rsa4096/683AB68D867FEB5C
     created: 2020-02-02  expires: 2022-02-02  usage: SC
     trust: ultimate      validity: ultimate
ssb  rsa4096/4B4C3D1428F04A81
     created: 2020-02-02  expires: 2022-02-02  usage: E
[ultimate] (1). Alexandru Puiu <[email protected]>
Next enter the toggle command, then key 1 (key you want to select).
To transfer the private key of the currently selected key you’re in, run keytocard
gpg> toggle

sec  rsa4096/683AB68D867FEB5C
     created: 2020-02-02  expires: 2022-02-02  usage: SC
     trust: ultimate      validity: ultimate
ssb* rsa4096/4B4C3D1428F04A81
     created: 2020-02-02  expires: 2022-02-02  usage: E
[ultimate] (1). Alexandru Puiu <[email protected]>

gpg> key 1

sec  rsa4096/683AB68D867FEB5C
     created: 2020-02-02  expires: 2022-02-02  usage: SC
     trust: ultimate      validity: ultimate
ssb  rsa4096/4B4C3D1428F04A81
     created: 2020-02-02  expires: 2022-02-02  usage: E
[ultimate] (1). Alexandru Puiu <[email protected]>

gpg> keytocard
Really move the primary key? (y/N) y
Please select where to store the key:
   (1) Signature key
   (3) Authentication key
Your selection? 1

sec  rsa4096/683AB68D867FEB5C
     created: 2020-02-02  expires: 2022-02-02  usage: SC
     trust: ultimate      validity: ultimate
ssb  rsa4096/4B4C3D1428F04A81
     created: 2020-02-02  expires: 2022-02-02  usage: E
[ultimate] (1). Alexandru Puiu <[email protected]>

gpg> save
Once complete, the private key is moved to your Yubikey, and the Yubikey will need to be inserted and unlocked with the pin in order to sign anything.
Configure Git to use our key
Now that we have our key secure, it’s time to configure Git to use it.
First, let’s verify that our key is set up correctly:
>gpg --list-secret-keys --keyid-format LONG
C:/Users/{username}/AppData/Roaming/gnupg/pubring.kbx
--------------------------------------------------------
sec>  rsa4096/683AB68D867FEB5C 2020-02-02 [SC] [expires: 2022-02-02]
uid                 [ultimate] Alexandru Puiu <[email protected]>
Next, we’ll point Git globally on our system to use our GnuPG installation as the default for gpg operations. You can also configure it per project, by removing —global and running these commands on every project, but for our purposes, system-wide works best:
>git config --global gpg.program "c:\Program Files (x86)\GnuPG\bin\gpg.exe"
>git config --global commit.gpgsign true
>git config --global user.signingkey 683AB68D867FEB5C
Now all our new commits will be signed using our key. Note that you won’t be able to commit anything without inserting and unlocking the private key.
Add the GPG Public Key to GitHub
This is a different set of keys than your SSH keys, but they are both managed under the SSH and GPG keys tab.
Open Kleopatra, double-click on your key, then click Export.... Make sure you’re exporting the public key. It should start with -----BEGIN PGP PUBLIC KEY BLOCK-----
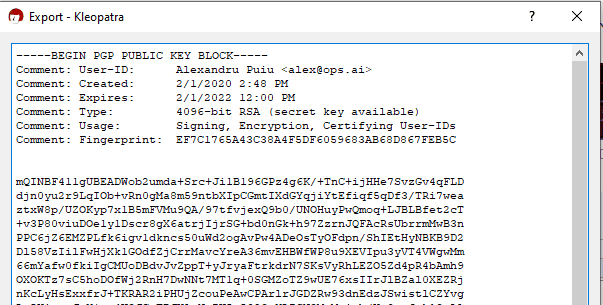
Copy the key. Then go into GitHub, click on your profile image -> Settings then on the left sidebar click SSH and GPG keys. Then click New GPG key and paste the key from above.
Test Signed Commits
When you try to commit your changes, you should be prompted to enter the pin for your key:
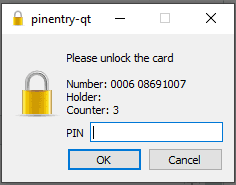
Then push the commit(s) to your GitHub project and go to your Commits tab on the web, and notice the Verified badge

Setting Up on Other Machines
Next, we’ll probably want to set this up on the other computers we use like our laptop.
First, we need to install Gpg4Win on the computer, and make sure it sees our Yubikey as a smart card.
gpg --card-status
If it doesn’t, just repeat the same steps as above, by creating a %appdata%\gnupg\scdaemon.conf file.
Next, import your public key. This is the same key you uploaded to GitHub. Save it as publickey.asc and run
gpg --import "publickey.asc"
Finally, configure Git to sign commits on this machine as well with our key.
>git config --global gpg.program "c:\Program Files (x86)\GnuPG\bin\gpg.exe"
>git config --global commit.gpgsign true
>git config --global user.signingkey 683AB68D867FEB5C
Subscribe To My Newsletter
Quick Links
Legal Stuff


