Table Of Contents
If you care about code quality and maintainability, then a static code analysis tool is a must, and the earlier in the process the developers know about a problem, the cheaper it is to fix. With this in mind, we, like many other teams, have code reviews through Pull Requests on every single piece of code that makes it into our product. Thanks to Microsoft doing such a great job with TFS/Azure DevOps, the process is very fast and intuitive, and quite comprehensive.
Our team follows a process adapted from Microsoft’s Release Flow [see: https://devblogs.microsoft.com/devops/release-flow-how-we-do-branching-on-the-vsts-team/], in which we create a branch off develop (our long-running mostly-stable product), do our work, commit it (with the PBI/Bug number in a comment), push the branch, then go into TFS and create a pull request. TFS will suggest a shortcut link to create a PR for the branch you just pushed to your default branch (in our case develop); or you can click the New pull request button and choose your source and target branches.

On the next step, it auto-links our Work Items (extracts it from the commit message), defaults the description to the last commit which we can modify, and one more click to create it and done. The whole process takes roughly 15 seconds from commit to PR.
The 2-step process to create the PR seemed like it could be improved, and luckily it could thanks to Jeffrey van der Stad for creating a solution with SourceTree custom tasks (see: https://github.com/JvanderStad/Utils/tree/master/SourceTree)
For a more complete description of our workflow see Application Lifecycle Management / World-Class DevOps
Installing SonarQube:
- Download the latest SonarQube, you’ll need at least Developer Edition for the TFS/Azure DevOps integration above, but the community edition offers incredible value to any team.
- Unzip the files to a folder on your server (ex: C:\SonarQube-7.4)
- SonarQube runs on java, so install the latest JRE, or preferably JDK if installing a production instance
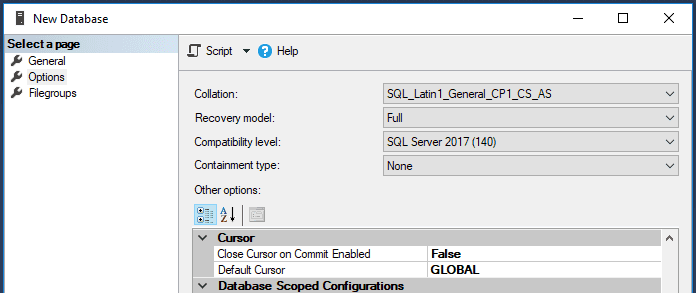
- Prepare your database (we use MS SQL Server 2016): Create a new database, and set the collation to be case-sensitive (CS) and accent-sensitive (AS) (ex:
SQL_Latin1_General_CP1_CS_AS)

Depending on your environment, either create a SQL account, or grant permissions to a service domain account. I recommend a domain account as best practice, with a proper password rotation policy, and running SonarQube as a service with that account using Integrated Security. As per SonarQube’s documentation (https://docs.sonarqube.org/latest/setup/install-server/):
- If you want to use integrated security, you have to download the Microsoft SQL JDBC Driver 6.2 package from https://www.microsoft.com/en-us/download/details.aspx?id=55539 and copy sqljdbc_auth.dll to any folder in your path. You should match the 32-bit or 64-bit version of the dll to the architecture of your server machine. If you are running the SonarQube as a windows service and want to use Integrated security, please make sure the Windows account under which the service is running has permission to connect your SQL Server. The account should have db_owner database role membership. Otherwise, if you are running the SonarQube server from a command prompt and want to use Integrated security, the user under which the command prompt is running should have db_owner database role membership. Also ensure that sonar.jdbc.username or sonar.jdbc.password properties are commented out, otherwise SonarQube will use SQL Authentication.
Open the sonar.properties file in the conf folder (ex: C:\SonarQube-7.4\conf\sonar.properties) and set the sonar.jdbc.url property, and make sure sonar.jdbc.username and sonar.jdbc.password are commented out:
sonar.jdbc.url=jdbc:sqlserver://localhost;databaseName=sonar;integratedSecurity=true
- Configure the Elasticsearch storage path. By default, Elasticsearch data is stored in $SONARQUBE-HOME/data, but this is not recommended for production instances. Instead, you should store this data elsewhere, ideally in a dedicated volume with fast I/O. Beyond maintaining acceptable performance, doing so will also ease the upgrade of SonarQube.
sonar.path.data=E:/sonarqube/data
sonar.path.temp=E:/sonarqube/temp
- The user used to launch SonarQube must have read and write access to those directories.
- Run bin\InstallNTService.bat as an Administrator to install SonarQube as a Windows Service
- If using Integrated Security and a domain, change the service to run as your domain user
- Start the service. SonarQube will start by default on localhost port 9000
Configuring SonarQube for production behind a Reverse Proxy and SSL using IIS:
This guide describes the process very well and it’s what we used: https://jessehouwing.net/sonarqube-configure-ssl-on-windows/
Installing Plugins and general configuration:
Once set up and logged in as an administrator, navigate to the Administration -> Marketplace section. This is where you’ll find most of the plugins. There are a few plugins that we use which aren’t in the list, but you can find them linked from SonarQube’s Other Plugins section. We use the following:
- CKS Slack Notifier https://github.com/kogitant/sonar-slack-notifier-plugin
- Csv export plugin https://github.com/VillageChief/sonarqube-csv-export-plugin/releases
- Dependency-Check https://github.com/stevespringett/dependency-check-sonar-plugin
- Git
- OpenID Connect Authentication for SonarQube
- And several languages including C#, C/C++, CSS, Go, JS, Java, PHP, Python, TypeScript. Install the ones relevant to the projects you have
The ones not available in the marketplace can be downloaded from the releases tab on github (or compiled yourself) and dropped into the [sonar directory]\extensions\plugins directory. You can do this while the service is running, in parallel to installing plugins through the marketplace
Once you installed all the plugins you want, you’ll need to restart the service
Configure email notifications:
- Navigate to Configuration -> General and scroll down to Emailand fill in your SMTP server’s details, then test your configuration
Configure base url:
- In Configuration -> General scroll down to Server base URL and set the publicly accessible URL of our server
Configure leak period / New Code Period:
- This sets the base used to generate metrics on your new code. A good starting point is previous_version In Configuration -> General scroll down to New Code
Configuring TFS build to analyze solution
First, set up a build definition to build your solution (see https://devscriptbuild.wordpress.com/2017/05/09/creating-a-build-definition-in-tfs-2017/ for a guide on the first part)
Install the SonarQube TFS/Azure Pipelines extension: https://marketplace.visualstudio.com/items?itemName=SonarSource.sonarqube
In the build steps, insert the following before your Visual Studio or MSBuild steps:

- Optional: Add a task to compute the version of your project like GitVersion (see https://marketplace.visualstudio.com/items?itemName=gittools.gitversion)
- Add a Prepare Analysis Configuration step

- Configure connection to your SonarQube server:
- Next to SonarQube Server Endpoint, click
+ New
- Next to SonarQube Server Endpoint, click

- Enter a name for your SonarQube connection
- Enter the URL of the SonarQube server. *TFS/VSTS needs to be able to reach this url
- Enter your Personal Access Token from SonarQube. To get a Personal Access Token
- Log into your SonarQube server
- Click on your profile image (top right) ->
My Account

Click on the Security tab

Under Generate Tokens enter a descriptive name for your TFS and click Generate

- Copy the token and paste it back in TFS into the Token field
- Click OK
- Select your SonarQube Server Endpoint
- Enter a unique key for your project
- Enter the name of the project as you want it to appear in SonarQube
- Enter the product version to display in SonarQube. Our builds compute the next version, so we just use the variable $(Build.BuildNumber) Optional: Enter any advanced properties you want to set for this project. Ex: customize the paths where to find the dependency check reports which are generated by a separate tool Next add the step to Build your solution Add a Command Line step for the OWASP dependency check There’s no Marketplace extension for this yet, so we download the tool to our Build Servers and unzip it into a folder (ex: C:\tools\dependency-check). Repo: https://github.com/jeremylong/DependencyCheck/releases
Set the Display Name to “OWASP Dependency Check” so it’s easy to see in the logs Set the Tool path. Ex: C:\tools\dependency-check\bin\dependency-check.bat Set the Arguments
--project "$(Build.DefinitionName)" -f ALL -s "$(build.artifactstagingdirectory)" --suppression "$(Build.SourcesDirectory)\cve-suppression.xml" -o "$(Agent.BuildDirectory)"
—project is the name of your project as you want it to appear on the generated report -f lets you specify the report to generate (xml, html, etc). In this case ALL makes sense for us -s is the path to the directory you want scanned. We scan the compiled build since we only care about the dependencies that make it into our build, but make sure to understand the difference before you choose —suppression lets you specify a list of CVEs to ignore during analysis. This is useful to exclude false positives from future analysis -o is the directory to write the report to Add a Run Code Analysis task This task uploads the SonarQube and dependency check reports to the SonarQube server Add a Publish Quality Gate Result task This displays the Quality Gate status in the build summary and gives you a sense of whether the application is ready for production “quality-wise” Save the build definition and Queue a new build on your main branch (ex: develop). This will analyze the branch and upload the results to your SonarQube server
Updating the name of the branch in SonarQube if your product branch is not called master
- Open the project dashboard in your SonarQube server
- Click on the name of the branch next to the project name, then click Manage branches

Click the gear icon on the line with your product branch and click Rename Branch

Enter the name of your product branch as it exists in TFS
Click Rename
Pull Requests Analysis and Feedback:
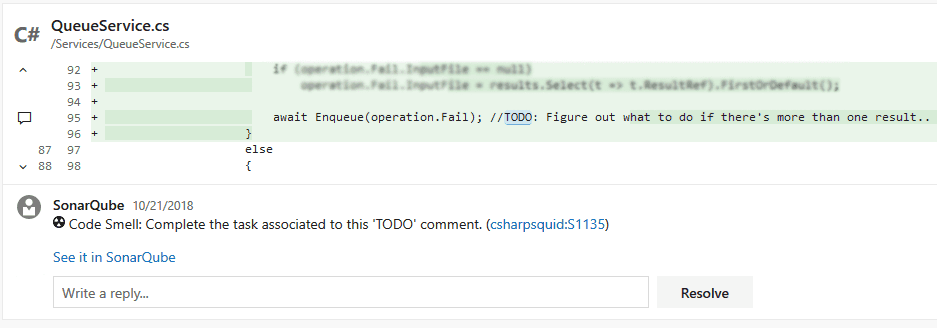
SonarQube can comment directly on the line of code it found an issue in, directly in the Pull Request.

Configuring in SonarQube:
In Configuration -> Pull Requests choose VSTS / TFS as your provider
Go to your VSTS / TFS and generate a Personal access token:
Click on your profile picture (top right) -> Security
In the Personal access tokens tab click Add, then give it a descriptive name
Set the Expires In based on your token rotation policy
Under Authorized Scopes choose Selected scopes and select Code (read and write)
Click Save
Copy the access token and enter it into the Personal access token field in SonarQube
Configuring Branch Policies in TFS:
- Under the Code -> Branches tab, you can see your branches and set branch policies, which lets you lock the branch down so changes can only come through Pull Requests

Click on the ... next to your main product branch (ex: develop) and click Branch Policies

- Here you can configure a number of reviewers, check for linked items, which I recommend, and then select
Check for comment resolution. This requires comments to be resolved before completing the PR.

Next under Build validation click + Add build policy

Under build definition select the build definition you created earlier, set the trigger to Automatic, the policy requirement to Required and you can set the build to be invalidated if the target branch is updated; then click Save

Click Save changes
Next create a Pull Request and wait for the build to complete
The first time the sonarqube server updates a PR, it registers a new status policy, which we can set to be Required
Open the branch policy page again
Under Require approval from external services click + Add status policy

Select the SonarQube/quality gate policy. Under Advanced, you can optionally select the identities that can update the status and apply filters or reset conditions
Click Save
Click Save changes on the branch policy
Subscribe To My Newsletter
Quick Links
Legal Stuff


